Cameras
Zenit Quarz 1x8S-2
 Brand: Zenit, KMZ (Krasnogorskiy Mechanicheskiy Zavod).
Origin: Russia (SSSR).
Format: Silent Super 8 emulsion film.
Lens Mount: C-mount that only fits the integral lens because of a focus lens piece fixed to the body behind the mount.
Lens: LOMO Meteor 8M1 f/1,8 9-38 mm.
Features: The camera is powered by a spring-wound motor, set to 9, 12, 18, 24 and 32 fps, as well as single frame exposure; the motor last about 33 seconds at 18 fps. It may be cable released. The aperture is situated behind the fixed focus lens and may be manually adjusted or set into auto exposure mode. A knob adjusts the auto exposure by two stops in either direction. It has a integral light meter powered by twin 1.35V batteries. The camera body hosts a Wratten filter switch for outdoors filming.
Accessories: Pistol grip. Cable shutter release. ND-4x and Dark Yellow-2x filters, as well as a pair of F=250 and 667 supplementary lenses, and a lens hood, all attachable to the Meteor 8M1 lens.
Pros: New and unused from the box. Flawless working. Spring-wound operation (no worries that batteries will run out). Soviet-Russian manufacture philosophy. Built like a Russian T-72 tank: robust all metal body. Minimalistic in functions. Removable lens C-mount. Cheap.
Cons: Made for amateur filming. Spring-wound operation (no electrical motor) which limits length of takes. C-mount only fits integral Meteor 8M1 lens. However, some cinematographers have reportedly attached anamorphic lenses to the Quartz with the help of adapters.
Zenit Krasonogorsk-3
 Brand: Zenit, KMZ (Krasnogorskiy Mechanicheskiy Zavod).
Origin: Russia (SSSR).
Format: Silent regular 16 mm emulsion film.
Lens Mount: M42x1
Lens: LOMO Meteor 5-1 f/1.9 17-69 mm.
Features: The camera is powered by a spring-wound motor with a 8, 12, 16, 24, 32 and 48 fps speed interval and single frame exposure; the motor last about 25 seconds at 24 fps. It is also possible to set the frame rate as low as 6 and as high as 50 fps so it is quite usable as a camera for slow motion takes. Cable release is an option. It has its own light meter powered by a 1.45V battery which is sensitive to the ISO/ASA and frame rate setting. The film is manually loaded (like an old Bolex) opening the side of the camera body.
Accessories: Comes with a pistol grip to which may be fitted a telescopic shoulder brace as an extension. 77 mm filters that comes with the Meteor 5-1 lens; one Ultra Violet (haze) UV-1x, one Neutral Density N-4x, one Light Yellow Y-1,4x, and two Dark Yellow Y-2x filters (with the same 77mm diameter but somewhat different sizes), as well as a large lens hood.
 Pros: Mint condition. Soviet-Russian manufacture philosophy. Built like a Russian T-72 tank: robust all metal body. Minimalistic in functions. Spring-wound operation (no worries that batteries will run out). Slow motion up to 50 fps. Pistol grip and shoulder support comes quite handy for stabilisation of hand held shooting. M42x1 lens mount for removable lenses. The Meteor 5-1 lens made specifically for the K-3 is the true price. A large lens hood comes with the lens that covers it properly. Both lens and camera are very popular in the West, used in several film schools. And it’s very cheap, which accounts for its huge popularity. The superior 16mm format!
Cons: Made for amateur filming. MOS camera (no audio sync). Spring-wound operation (no electrical motor) which limits length of takes. Quality control; I might have received a faulty copy (there have been reports of such in the past). Standard 16 mm (as opposed to Super 16). Loading of film is quite tricky in complete darkness. After my first try something must have gone wrong as the film wasn’t exposed correctly and ruined the entire film roll.
Zenit Kinor 16SX-2M
 Brand: Zenit, KMZ (Krasnogorskiy Mechanicheskiy Zavod).
Origin: Russia (SSSR).
Format: Regular 16 mm emulsion film with pilot sync audio.
Lens Mount: Domestic bayonet that only fits the Kinor-16 range of lenses.
Lens: LOMO 16 OKS 3-10-1 f/2.1 10 mm.
Features: The camera is powered by the 29EPSS electrical motor that is pre-set to 25 fps, adapted for European (and Soviet) television broadcast, synced to a tape recorder with a analoge pilot tone. (Although cables were attached with my camera I never received the required 12V battery and thus haven’t had the chance to test shoot the camera; my plan is to have the camera modified to modern standards with a crystal sync configuration of 8-60 fps.) The camera hosts a registration pin, a feature that fixes the film to the (7.42 x 10.05 mm sized) gate during exposure to create a sharper image (at a variable of approx. 0.015 mm) and which usually comes with expensive Arriflex cameras. The camera has a bladed mirror shutter with a 170 degree angle (giving a 1/53 s shutter speed at 25 fps) and the motor has a handle attached with a electrical start and stop button. The operating noise coming from the camera is specified to 42 db but good maintanience and lubicants are said to lower that figure. The Kinor has a adjustable optical reflex viewfinder (with a 9.5x  magnification) which can be tilted upwards for easier watching in low angle positions. The viewfinder ground glass covers an 11.1 x 7.7 mm area (i.e. in excess of the actual film gate) and has cross hairs and two sets of markings, the innermost of 8.4 x 6.3 mm size referred to as “important area of image”, used as a reference for 1970’s and 80’s Soviet style telechine scanning, and the other of 10.1 x 7.45 mm referred to as “Academy 16”; a 1.78:1 ratio would cover 10.1 x 5.67 mm in the ground glass, that is, the innermost marking could serve as a rough reference for cropping an image into 16:9 in post (see attached image).
Accessories: My camera came with four 30 m /100 feet film all metal cassettes which are quickly released and attached to the camera body (Kodak Daylight Spools fit to the cassette); there are also 120 m / 400 feet cassettes produced for the camera but I haven’t aquired any yet. A basic set of 62 mm filters for LOMO prime lenses: Neutral Density N-2x and N-4x, plus colour temperature fiters K4500 (yellow), K6000 (orange) and K8000 (red).
 Pros: Purported high build quality. Soviet-Russian manufacture philosophy. Built like a Russian T-72 tank: robust all metal body. Minimalistic in functions. The use of a registration pin. Large range of prime and zoom lenses from the Russian maufacturer LOMO, namely the following prime lenses: 16 OKS 1-6-1 f/1.8 6 mm, 16 OKS 3-10-1 f/2.1 10 mm, 16 OKS 3-15-1 f/2 15 mm, 16 OKS 2-20-1 f/1.9 20 mm, 16 OKS 1-25-1 f/2.5 25 mm, 16 OKS 8-35-1 f/2 35 mm, 16 OKS 1-50-6 f/2 50 mm, 16 OKS 1-75-1 f/2 75 mm, 16 OKS 1-100-1 f/2 100 mm, 16 OKS 1-150-1 f/2.8 150 mm, 16 OKS 7-200-1 f/2.8 200 mm, and 16 OKS 6-300-1 f/3.5 300 mm. The zoom lenses are: 16 OPF 12-1 f/2.5 10-100 mm, 16 OPF 1-2M-01 f/2.4 12-120mm, and a wide angle adapter which attaches to both lenses which lends a 7.5-75 mm range to the 16 OPF 12-1 and a 9-90 mm range to the 16 OPF 1-2M-01. Fairly popular amongst independent filmmakers because it’s easy to modify and modernize to Western standards. Relatively cheap. The 16mm format!
Cons: Limited to 25 fps in its original form (but may be upgraded with modern crystal sync motors). When tilting the optical reflex viewfinder the entire image tilts to the left correspondingly, which makes panning ankward. Domestic lens mount which limits the camera to its own range of Russian LOMO lenses. The biggest con is of course that I cannot use it at all right now because of the lack of the original Kinor battery, but all the more because the camera needs to be modified to crystal sync to be able to use it with sound using a digital audio recorder.
Blackmagic Pocket Cinema Camera (BMPCC)
 Brand: Blackmagic Design.
Origin: Australia.
Format: Full HD 1080p Super 16 sCMOS lossless CinemaDNG RAW digital film, as well as ProRes 422 HQ, ProRes 422, ProRes 422 LT, and ProRes 422 Proxy video, with 2 channels of 48 kHz and 24-bit audio.
Lens Mount: Active Micro Four Thirds (MFT).
Features: Professional digital cinema mini camera with a Full HD 1080p (1920 x 1080) resolution on a Super 16 Digital Film (12.48mm x 7.02mm) sized Fairchild Imaging CIS1910 sCMOS sensor. Records on 23.98, 24, 25, 29.97 or 30 fps with various file formats: Adobe’s CinemaDNG RAW with a lossless compression that has zero loss of detail but only mild compression with about 35% file size reduction for very blurry / underexposed / overexposed images ranging to around 25% file size reduction for well focused, well exposed, detailed images, with 13 stops of dynamic range and 12 bit 4:4:4 colour space, and Apple ProRes 422 HQ with 12 stops of dynamic range and 10 bit 4:2:2 colour space compression. Also ProRes 422, ProRes 422 LT, and ProRes 422 Proxy. SDXC Recorder that captures the images (including RAW and ProRes HQ files) straight into a high quality fast SDXC flash memory card. An active Micro Four Thirds mount that is able to electronically control the iris and autofocus of the lens, as well as providing iOS stabilisation, on those lenses that support these features. Solid magnesium alloy chassis with a battery terminal fitted for the EN-EL20 removable and rechargeable Lithium Ion Battery, developed for Nikon cameras, as well as SD card slot and USB 2.0 Mini-B port for firmware updates, and two robust 1/4″ – 20 mounting threads (one on the top and one on the bottom of the chassis) for tripods and accessories. A 800 x 480 resolution 3.5″ LCD monitor displaying camera status on screen while monitoring the shot, as well as reviewing recorded material in play back using four buttons on the top of the chassis (play, forward and reverse, as well as start/stop button). A second array of nine buttons at the back of the camera body (four directional buttons and one “ok” button, as well as iris, focus, menu and power buttons). The focus button turns autofocus on/off on active lenses in a similar manner as the iris button controls autoiris; one press activates a autofocus square which focuses objects within its frames and freezes the focus after it has been set. Left arrow steps iris down and right up in the following f/ increments: 3.5, 3.7, 4.0, 4.5, 4.8, 5.2, 5.6, 6.2, 6.7, 7.3, 8.0, 8.7, 9.5, 10, 11, 12, 14, 15, 16, 17, 19, 21, and 22. Pressing the focus button twice activates focus peaking and pressing the “ok” button twice activates the 1:1 zoom function, making focus pulling easier. The menu button provides fast access to the menu for camera settings. Five connections on the left side of the chassis provides in descending order: Uncompressed 10 bit micro HDMI type D output with optional overlays for easy on set monitoring, 2.5 mm LANC for remote control, 3.5 mm mini jack microphone input that’s compatible with AV microphones, plus a mini jack headphone socket for audio output and monitoring of 24 bit 48kHz uncompressed audio recording, and 0.7 mm 12V DC power input; the last one charges the battery while in the terminal.
 Interface: The menue button opens up the operating software interface. One push to the menu button gets you to the dashboard from which you may navigate to Metadata, Settings, Format Card, Focus Peaking, Meters and Frame Guides. Navigating and chosing parameters is always done with the directional buttons and pressing “ok”. Focus Peaking is a feature in which edges in focus are highlighted with light blue, which aids in focus pulling; this is accessible also trough one single push on the focus button on the back of the camera. Meters activates a small section on the bottom of the monitor with video histagrams showing blacks, whites and greyscales, whereas the VU meter monitors audio levels with greens, yellows and reds, yellows being the recommended audio level; these are also activated through pushing the “up” button and deactivated throgh the “down” button on the back of the camera. Format Card takes you to a submenu where you may choose to format the SD card between HFS+ (optimised for Apple computers) and exFAT (optimised for Windows); formatting is recommended on camera and is only a matter of seconds. Frame Guides activates the different aspect ratios for the monitor available in the Display submenu (see below).
 Chosing the Settings icon you enter the main interface of the camera which divides into four submenus: Camera, Audio, Recording and Display. Pressing the Menu button prolonged gets you into Settings submenu bypassing the Dashboard. Entering Camera you may choose the Camera ID (which shows in the file names). Next you set the Date and Time (the time is thankfully standardised to the 24 hour format). ISO is set to 200, 400, 800 and 1600 intervals; the BMPCC is optimised for ISO 800. White Balance has a wide range (with small increments) of 2500, 2800, 3000, 3200, 3400, 3600, 4000, 4500, 4800, 5000, 5200, 5400, 5600, 6000, 6500, 7000, 7500, and 8000K, which is good enough for most situations. Shutter Angle is set with intervals of 11.25º, 15º, 22.5º, 30º, 37.5º, 45º, 60º, 72º, 75º, 90º, 108º, 120º, 144º, 150º, 172.8º, 180º, 216º, 270º, 324º, and 360º; the 180º is set by default. The Audio submenu controls channel 1 & 2 input levels (microphone or line), “yes” or “no” if channel 1 uses channel 2 input, microphone input, as well as channel 1 & 2 input and speaker volume, measured 0-100%; it is set by default to 50%. Entering the Recording submenu the different settings for the recording format are adjusted. The Recording Format toggles between RAW (CinemaDNG), ProRes (422) HQ, ProRes 422, ProRes LT, and ProRes Proxy. Dynamic Range is set between Film and Video (Rec. 709) mode; CinemaDNG RAW is only available for Film, while all other codecs are open for both. Frame Rates toggles between 23.98, 24, 25, 29.97 or 30 fps; if you want to shoot film, 24 fps is the only viable alternative, the others being adapted for television. In Time Lapse Interval mode you can set the camera to take a still frame every 2nd, 3rd, 4th, 5th, 6th, 7th, 8th, 9th or 10th frame for each of the set Frame Rates above, creating a speeded up effect with actual frame rates of 12, 8, 6, 4.8, 4, 3.43, 3, 2.67 or 2.4 fps if the camera is set for 24 fps recording. Alternatively, the Time Lapse Interval may be set to one still frame taken every 1, 2, 3, 4, 5, 6, 7, 8, 9, 10, 20, 30, 40, or 50 seconds, or every 1, 2, 3, 4, 5, 6, 7, 8, 9 or 10 minutes.
 The Display submenu governs the monitor on the back of the chassis, or an external monitor; no settings in this submenu affects the actual recorded image. Dynamic range may be set between Video or Film; many set it to Video to get a approximation of the final result after grading. Brightness is set between 0 and 100%; great brightness of course eats battery power but may be necessary in outdoors shooting. Zebra highlights overexposed areas of the picture with vertical stripes, and may be set with 75, 80, 85, 90, 95 and 100% increments. Language toggles between English, Chinese and Japanese. Frame Guides may be set between HDTV (16:9), 4:3, 2.40:1, 2.39:1, 2.35:1 and 1.85:1. Guide Opacity affects if the cropping (the black bars) are black or translucent, and to which degree, set for 25, 50, 75 and 100% (the last being non-transparent black). Thirds is a frame guide feature which creates bars to divide the frame into nine areas for optimal composition. However, the dashboard icon Frame Guides must be activated (highlighted) for this feature to work properly; you may easily activate or deactivate this feature for your favorite aspect ratio. HDMI Overlay only affects the external monitor connected to the HDMI port and may be set to Off (showing a clean picture) or All (showing all previous Display settings), or if preferred only the Status bar (on top of the picture) or Guides (i.e. aspect ratios). LCD Overlay sets the Display settings on the onboard screen On or Off; this means that you may have different settings visable on the camera monitor and the external display.
 Pushing Metadata on the dashboard gives you the opportunity to enter important information concerning your project which will be visable in the editing software, such as naming your project, identifying the Reel, Scene, Shot, Take and Angle. Metadata is entered using a keyboard display pressing the directional and “ok” buttons. Each clip has its own metadata file which also may be entered when pressing “Ok” while watching play back, with the possibilty to auto-increment these numbers which adds them up in the next clip. Each time you enter Metadata on a project before filming with the camera (with a new SDXC card) all of the entries (which are factory preset on delivery) are transferred and repeated in each shot, which has to be deleted using the keyboard. The Status Strip is always visable on the BMPCC monitor for vital information, along the top of the screen. From left to right, the following information is presented: Recording status may state either “No Card” (in orange), “Ready” (in blue) or “Card Full” (in orange) regarding the SDXC flashcard, or display a Red Icon (a red dot) when recording (which flashes if dropped frames are detected), Time Lapse (written in red), or Playback mode (a blue arrow). A time code with all necessary information of the duration of clips, down to each frame, during recording and playback. Recording format, such as RAW, ProRes HQ, etc. Resolution and preset frames per second. F-stop (only on lenses that support the MFT active mount) which my current configuration don’t support. The ISO setting, 200-1600. The White Balance setting in Kelvin, 2500-8000K. Battery status in accurate precentage increments. On the bottom of the display is presented the following on-screen meters: Video histograms, showing levels from blacks (left) to whites (right), and greys in between. Time remaining on the SDXC card in hours and seconds, which turns from white to red when there is 5 minutes remaining and blink when there is 2 minutes left of footage on the card. Audio meters with peak control, displayed in greens (low), oranges (optimal) and reds (to high).
 Accessories: Lens mount cap for the protection of the sensor (when no lens is attached to the MFT mount). International power supply adapter unit with four different AC connector adapters that connects to the 12V DC input of the camera. A simple wrist strap. One rechargeable Li-Ion EN-EL20 battery stamped with the Blackmagic Design (BMD) brand (the high quality battery is supposedly manufactured by Blackmagic Design itself). One Sofware and Manual SD card that has the following contents: Blackmagic Camera Manual (a common manual for the Blackmagic Micro Cinema Camera, Blackmagic Pocket Cinema Camera, Blackmagic Cinema Camera, Blackmagic Production Camera 4K), Blackmagic Production Camera Manual (a common manual for the Studio Camera and Micro Studio Camera 4K), and Blackmagic URSA & URSA Mini Manual. It also contains the Blackmagic Camera Setup sofware for installment used for firmware updates; these are first downloaded into the computer hard drive from the Blackmagic Design webpage and then transferred through USB cable to the BMPCC. There hasn’t been any more firmware updates since 19 March 2015, with the Blackmagic Camera 2.1 update. One DaVinci Resolve Sofware and Manual SD card containing the following: The DaVinci Resolve 12.2 software for installment, Resolve 12 Manual, a directory of Sample Clips containing a Chart and Houses, as well as a Tutorial Clips subdirectory that contains tutorials on Curves, Primary, Secondary, Sizing, Tracking and a Tutorial for Resolve. There is currently a Blackmagic DaVinci Resolve 12.5.4 version for download on the Blackmagic Design webpage as well as the current 12.5 version of the corresponding manual from 2016, making the DaVinci Resolve 12.2 software and manual from 2015 as contained in the SD card reduntant.
 Pros: An adorable little camera with big possibilities. The Fairchild Imaging CIS1910 sCMOS sensor combining the best of analogue CCD and digital CMOS technology resulting in high dynamic range, good light sensitivity and low video noise. The image quality created in RAW is flat straight out of the camera (in ProRes captured in a flat film log); its image may be compared to a digital negative which requires grading and colour correction in postproduction, with results in marvelous and stunning images that emulates the look Super 16 or Super 35 emulsion film; there so much information to extract in grading. The dynamic range (exposure) and bit rate (colour information or resolution) creates one of the best images that I have seen and comparable to the images produced by the Ikonoskop A-Cam dII and the Digital Bolex D16 (although each of these Digital Super 16 Film Cameras have their own distinct look), and even the Arri ALEXA. The image is pleasently soft and sharp at the same time, like old film stock. Contrary to many reports I find the BMPCC to handle low light situations quite well with lots of information left in the shadows, at least with CinemaDNG RAW footage; it gives a clear and detailed image created by the natural light coming from street lights. Footage coming from the BMPCC may create a diverse impression, depending on white balance, ISO setting, shutter angle and grading, however almost always a very filmic image. The 12-bit colour depth may create a result reminecent of old Technicolor, or if you prefer, as if it was 35 mm from the 1990’s. Some of it looks like Super 16 stock. Skin tones are warm and alive, colour vivid and vibrant. The dymanic range of 13 stops carves out details in the shadows and highlights alike. Even the “noise” coming from the camera when shooting in low light and high ISO/ASA looks like film grain rather than digial pixelation. The BMPCC combines the best of both digital technology and emulsion film chemicals, providing a true Super 16 image without the need for expensive film stock, development and telecine. The Super 16 sized sCMOS sensor and the short flange distanse MFT mount fit the camera with a range of professional Super 16 prime and zoom lenses, which disregards the cropping factor. The lens is easily mounted to the body by joining the red dot on the lens to the red dot on the mount, and easily snaps to place screwing it less than a quarter turn. The MFT mount is released with a big button and screwed out in reverse order; very ergonomic and practical in field conditions. The active MFT mount can use a wide range of lenses from different manufacturers with the proper adapter, also lenses that may be controlled from the camera, such as iOS stabilisation as well as Iris and Focus control. Autofocus works well enough and quite fast in most cases if the lighting is sufficient (very deep shadows may pose a problem); after the focus has been set within the focus frame it freezes and doesn’t change regardless of camera movements, which is a great feature. Focus Peaking is a very handy feature and it helps to be able to look on the dashboard if Focus Peaking is activated, as it is easy to forget if it was activated or not, as the blue highlights sometimes are somewhat hard to spot immediately.
 The handling of the camera is super easy; the buttons and entering the menus works allright. It’s more or less point the camera, check exposure and focus, and shoot; no rocket science here. The matte surface of the LCD screen prevents reflections, and overall it works quite well, especially during the night, but even during the day when there is a overcast and shade blocking direct sunlight the image is quite visible. The camera has a easy and intuitive interface with all of the necessary menus, providing simple control of the camera; one learns all of its features in less than half an hour. The possibility to set White Balance with intervals ranging from 2500K up to 8000K, and the wide array of Shutter Angles from 1.25º to 360º, gives lots of headroom. The time lapse feature is one of the stronger points of the BMPCC. Zebra is a great feature helping in preventing overexposure. Frame Guides is also a good feature if you have 16 mm lenses that crop the corners, in which you may crop the picture to mask the lens vignetting and / or get that cinematic look, and given the high sharpness quality of RAW this doesn’t affect the resolution noticable. In camera formatting of SD cards is handy, as well as entering Metadata in camera; by entering your own metadata before staring to shoot your first clip, in which all of that data will be transfered to each clip, you will have minimal need to change data, if the requirenments stay the same through the shots. Attached to a mount, working yourself in and out of the menus to adjust settings doesn’t seem to affect a static camera setting. The buttons don’t need any force to activate; not even changing the SD card seems to affect the position of the camera. The bypass to camera Settings is a great feature in this regard; it’s also good that the camera returns to the same submenu pressing the menu button on and off, minimizing the actual amount of pressings. Putting in metadata to a project scene in between takes would probably make visable changes to a static camera mount. However, the small size and the battery terminal grip really makes pressing buttons quite comfortable, holding the chassis in the hand without the lens or any other accessories. All in all, the program inteface of the Blackmagic Pocket Cinema Camera is intuitive and easy to understand, presenting all of the vital information and control over the camera and recording in an instant.
 Furthermore, good on screen display of camera information with video histogram, audio level indicators (VU meters), tracking of remaining record time; the data contained on the screen is more than adequate to keep track of vital camera and recording information, without getting in the way and distracting (the bottom strip is removable and the top is very small). Good cable connections with the possibility of connecting external batteries to the camera, a Micro HDMI port making it possible to connect the camera to an external monitor, as well as mini-jacks for a external microphone which enhances the sound quality (especially when looped through a pre-amp), and headphones for check of audio levels. There is an approximate 1:1 ratio between battery life and SD card size (time of footage), somewhere around 20 minutes if shooting RAW; simply change batteries when it’s time to change the memory card. The international power supply adapter really comes handy when working with the camera indoors, such as entering metadata, looking through footage, setting the camera, etc. The power supply adapter really is indespensable when doing time lapses, as those can take several hours to complete which would have made battery replacement necessary, as the camera has to be powered up during the entire time lapse. The timelapse feature works as expected and makes these types of takes simple compared to my Super 8 and 16 mm cameras, in which you dauntingly have to shoot each frame manually; just point the camera, set the time and press the red button – and make shure that you have continous battery life for at least four hours! Display Overlay is a very usable feature letting you have different settings visable on the camera monitor and the external display. The small size (128 × 66 × 38 mm) and light weight (355 g) form factor, even with a heavy lens mounted on, really helps in getting those hard, cumbersome and ankwards shots. The camera has a chassis that feels as it has been hewn from a rock; the lens mount seems to be grown out of the metal chassis, feeling extremly stable. It has a ergonomic grip which carries and protects the battery terminal, the front of the chassis being covered with a smoth rubber coating which feels really comfortable in the hand. After 10 minutes or so of the Blackmagic Pocket Cinema Camera powered up, the camera body starts to feel distinctly warm. Not hot, but pleasently warm which is quite comfortable for the hand and probably may come handy in colder situations if holding to the battery terminal grip. However, being out when the temperature is below 10º Celsius seems to cool off the chassis as the warmth is hardly discernable. The battery terminal is easily opened and closed by pushing a button on the centre on the lid. The EN-EL20 battery is quite easily inserted to and removed from the terminal at the bottom of the chassis. The on/off button has been depressed to prevent a accidental turning off of the camera. One push on the power button boots up the camera in less than five seconds (although having a active MFT lens attached may prolong the boot with several seconds); a long push shuts down the camera. And all of this for the set price of $995!
 Cons: A cropping factor of 2.88x with lenses adapted for the 35 mm format. Because of the Super 16 size of the sCMOS sensor 16 mm lenses may viginette below F= 60 mm. The small S16 sensor of the camera exhibits a large depth of field (i.e. it’s harder to set a shallow depth of field) compared to a large sensor DSLR, however not at all impossible. The small sensor also reports a bad low light capability, which may be compared to the ability of many DSLR’s. It does exhibit noticible noise in the shadows, even at ISO 800, especially when raising saturatio. However, this noise is randomized and resembles film “grain” to a certain extent and thus isn’t properly an issue as rather enhances the cinematic experience; the image looks organic, also with the grainy noise. In particular the reds noise up the shadows, and when saturated may start to look somewhat videotesque, almost resembling the static of old cathode ray tubes. However, there is a fixed pattern noise (FPN) there as well (often subtle but sometimes quite visible) in the form of vertical stripes in low light exposure, during some night scenes (and in a few instances quite painfully visible), unfortunately breaking the illusion of the celluloid emulsion film experience reminding you that you are watching video. Lowering the blacks in the shadows during grading helps masking the FPN somewhat, however a proper noise reduction OpenFX is required for DaVinci Resolve (such as the Neat Video plug-in that I have installed) as I only work with the DaVinci Resolve Lite version. Better yet, this camera should be treated as a regular film camera, which needs good lightning in a controlled environment, for optimal performance. The camera may exhibit some visible moire against repeated straight patterns and aliasing in certain situations. The camera eats up battery power really fast (~20 min, counting power switched off when not recording or composing) and digests 64 Gb SDXC cards about the same time when shooting RAW; lots of spare batteries and multiple SD cards are recommended. After starting up the camera and just navigating through the menus, the battery status reads below 90% only after a few minutes. It’s at least good that there is a approximate 1:1 ratio between flashcard and battery life; changing the card corresponds to changing the battery if shooting RAW. The connector jack of the power supply cable sticks out in a straight way making it vurnable for shock; making the connector 90º would have been better. The LCD screen sports standard (800 x 480) resolution and is almost impossible to use in direct sun light, washing out the image completely. The focus peaking feature is sometimes a bit ankward to use properly because of the quite small size of the 3.5″ screen, but often works good enough. In strong sunlight, though, focus peaking is a pain to spot. However, an external screen is a necessity to be able to pull focus correctly. (Luckily enough, it’s fairly easy to get well focused shots, probably thanks to the Cinema DNG RAW format.) The screen lacks a touch screen function and the use of plastic buttons to navigate though the menus is quite cumbersome; these buttons are quite small and may pose a problem for some but for me they work ok as my fingers are moderately thin and I seldom hit the wrong button. But after a while, when putting in metadata or other types of information, the fingers tend to get a bit sour; while the buttons on the back are rounded and quite comfortable the ones on the top are edgy and flat, and a bit shallow. In darkness it is difficult to orient where to find each button but after a while you get the sense to find them with some effort.
 The downside of the small size and weight form factor is that the Blackmagic Pocket Cinema Camera needs stabilisation. The wrist strap doesn’t attach easily to the chassis. The camera records in two channels like all digital cameras but the on board microphone is really bad exhibiting distortion. There is no possibility to erase footage in camera and ISO is only set between 200 and 1600, which is quite limited compared to most DSLR’s (however, shooting in RAW makes this feature altogether redundant, as it is finally set in post). Metadata may not be entered into a timelapse sequence in camera; this may be remedied by taking a quick shot before the actual timelapse, naming the project and entering any data into that clip. The odd thing about the Metadata feature is that when I switch over to another SDXC flashcard (after filling up the previous with footage), entering metadata all the numbers are incremented in tens. Although entering metadata can be really daunting, considering the primitive way that you have to press each key using directional buttons on a digital keyboard, the function itself excludes the camera from the amature segment. But there is no slow motion features on the camera, which is a shame considering that the Fairchild Imaging CIS1910 sCMOS handles very high frame rates. Rolling Shutter Distortion is an issue for some, however not for me as this is supposedly compareble with most DSLR’s. The camera lacks professional XLR or SDI connections (only mini-jack and Micro HDMI); the Micro HDMI port (for external monitors and recorders) easily brake from wear which makes a cage with a protective clamp a necessity. There has been reports concerning a not perfect fit with the MFT mount, creating a minor play or wiggle in the lens, in particular with early batches of the camera; mine exhibits play with the RafCamera M42x1-MTF adapter, however miniscule. Compared to other cameras with a MFT mount (such as the Olympus PEN E-PL1) the BMPCC mount exhibits even less play with a dedicated MFT lens (such as the Olympus M.Zuiko Digital ED 14–42 mm f/3.5-5.6 L). The camera is only delivered with the BMPCC chassis with no lens attached to it; requires lots of additional accessories to be worked in a professional setting, such as lens adapters, spare batteries or external power mounted on a V-mount, and the use of a cage with rod adapter (for 15 mm rods) mounted with follow focus, matte box, monitor, preamp for sound and external microphone, which raises the price to an amount which exceeds the original $995 barrier at least twice as much. The RAW files coming from the BMPCC also need a powerful workstation and editing/grading program; luckily, Blackmagic Design offers one (DaVinci Resolve 12.5) for free. As the pros greatly outweights the cons, I have dedicated the BMPCC as my A-Camera.
Glass
Zenit/LOMO Meteor 5-1
 Brand: Zenit, KMZ (Krasnogorskiy Mechanicheskiy Zavod), LOMO (Leningradskoye Optiko-Mekhanicheskoye Obyedinenie).
Origin: Russia (SSSR).
Format: Regular 16 mm.
Lens Mount: M42x1.
Camera: Zenit Krasnogorsk-3.
Features: The Meteor 5-1 lens is specified to a iris aperture of f/1.9. The iris ring adjusts f-stops continuously stepless from f/1.9 to 22. The focal lenght (F) range is 17-69 mm and the zoom is adjusted or pulled with a lever attached to the side of the lens, with a detachable extension rod screwed into the lever for controlled zooming. The lens has a front focus element that rotate the barrel quite smooth.
 Accessories: Detachable extension rod screwed into the zoom lever for smooth zooming. There is a range of 77 mm filters that comes with the Meteor 5-1 lens; my lens can be fitted with one Ultra Violet (haze) UV-1x, one Neutral Density N-4x (stopping down 2 f-stops), one Light Yellow Y-1,4x, and two Dark Yellow Y-2x filters (with the same 77 mm thread diameter but somewhat different sizes). Shooting in daylight and full or moderate sunshine necessitates the use of the ND filter. There is also a quite large lens hood and lens cap fitted for the 77 mm thread; the lens hood is useful for outdoors shooting to prevent flares, especially during daylight. One additional accessory that I have aquired for the lens is the M42-MFT adapter from RafCamera who’s elongated shape is optimised for the Meteor 5-1 which penetrates deep into the camera behind the mount, fitting cameras with the Micro Four Thirds lens mount such as the BMPCC. Another accessory that I have purchased is the RafCamera Follow Focus Gear For Meteor 5-1 1.9/17-69mm zoom lens (80-93.6-20mm), especially adapted for the Meteor 5-1 lens, which uses a rotating front element for focusing, necessitating a broad or thick surface for the gear teeth, as it moves sliding back and forth when focus is pulled.
 M42-MFT Adapter: My RafCamera adapter fits perfectly on the Meteor 5-1 lens thread and attaches well to the BMPCC Micro Four Thirds mount as it is supposed to with no focusing issues at all, which seems to indicate that it has a optimal flange focal distance; I cannot detect any noticable difference when pulling focus between the Meteor 5-1 lens attached to my BMPCC and my Krasnogorsk-3. It is easy to pull focus with the Meteor, which even maintains focus when its focal length changes. However, one may detect a slight loose between the MFT mount and the M42-MFT adapter but the play is almost unnoticeable; I haven’t met any issues with this adapter play in normal field conditions shooting with the BMPCC and Meteor 5-1 lens and reviewing the footage on the screen. The rear part of the adapter is detachable by loosing a set of three screws, making it possible to turn the body of the lens if you need to place the red lens index mark at a different position. This is especially a good feature as the original position of the Meteor 5-1 zoom lever is placed pointing slightly downwards from the lens body. Placing the Blackmagic Pocket Cinema Camera with the Meteor 5-1 lens on a table, with the M42-MTF adapter left at its original setting, makes the lens lever hinder a level placement of the camera. Screwing the long extension rod onto the zoom lever would force me to lay the camera on its side, which is a risky business. Also, the Meteor 5-1 lens feels quite heavy compared to the BMPCC chassis, making the combo quite front-heavy and off balance. The lens being quite large and heavy, it requires the acquisition of a extra support for the lens attached to the 15 mm rod system of a rig. But with the zoom lever placed in its original downward position, this leaves very little room for the support to fit onto the lens. Leveling the lever out towards the left side provides more space on the bottom of the lens for a lens support. Also, I find that it feels more natural to grip the zoom level in my hand when it extends perpendicularly from the camera body rather than diagonally. Thus, I loosened the three screws using a allen key (provided by RafCamera) and adjusted the lens slightly clockwise while mounted to the Blackmagic Pocket Cinema Camera to get the preferred perpendicular position.
 Follow Focus Gear For Meteor 5-1: Made from aluminum, lightweight and sturdy. The dimensions of the RafCamera follow focus gear is 80 mm in its inner diameter, with a 79 mm stop rim, and an outer diameter of 93.6 mm; its thickness is 20 mm, well enough for my needs. It has a 0.8 mm module cine pitch, making it compatible with most follow focus gear, including the Petroff follow focus gear that I use myself; both work seamlessly together. The follow focus gear ring has three allen screws which fastens it to the front barrel of the Meteor 5-1. Unfortunatey, I would say, it also features a stop rim which makes it impossible to adjust the placement of the ring on the barrel; I would have preferred to attach the follow focus gear slightly further back to make it possible for the barrel to move safely within the matte box rubber diaphragm, but now I’m forced to use a separate lens hood instead to extend the barrel for use with the matte box (filing off the rim is not an option). Also, procruding a millimetre from the front element, it makes it a bit ankward (but not impossible) to attach the Zenit lens cap and lens hood, especially the former, as the follow focus gear makes the front opening of the foward lens barrel narrower, which provides more friction and resistance. But it is possible to screw almost the entire cap all the way into the 77mm thread, if you use enough force. But it took me several tries to make the 77mm male thread to find the entrence of the female thread when mounting it in the field. On the other hand, it is quite easy to attach and remove the follow focus gear ring to the lens, using the allen wrench that comes with it; but I will leave it attached to the lens, as I now regard it to be an integral part of it.
 Pros: Seems to be a parfocal lens, i.e. it maintains consistant focus when its focal length changes throughout the entire focus range, at least good enough for my needs. It is more sharp than expected, very good actually above f/11, even if blown out on a larger 32″ 16:9 screen, but that problable has more to do with CinemaDNG RAW enhancing resolution with its high dynamic range and bit rate, in which the Meteor contributes with a pleasant filmic softness to the image. The lens does give a overall warm, soft and pleasent picture quality to any film stock. Footage taken together with the BMPCC and CinemaDNG RAW is a very positive suprise as it gives a added sense of classical celluloid film look, including distinct lens flares (a feature I really like). The graded result really brings out the colours in any image and reminds me much of the soft, warm and saturated look captured from 16 mm film with a Krasnogorsk-3, or in other words a lot like Super 16 film. One strong point with the Meteor 5-1 (or any such lens) is that it is adapted for a standard 16 mm gate size of 10.26mm x 7.49mm, which is comparable to the BMPCC sCMOS sensor size of 12.48mm x 7.02mm. This reduces the 35mm lens crop factor from the usual 2.88x nex to nil (depending on how you count). Considering the small sensor size, it is suprising to see the shallow depth of field that is possible to extract from the BMPCC-Meteor 5-1 combo. The Meteor especially excells in low-light conditions, which compensates for the professed bad low-light handling of the Blackmagic Pocket Cinema Camera. I have shot both in night and day, and I really appreciate its light sensitivity; it is a quite fast lens with its f/1.9, especially compared to equivalent Russian zoom lenses manufactured for the Kinor 16 (see above) but also to Western equivalents; the speed of the Meteor is quite remarkable considering it’s a zoom lens. It handles the natural light coming from the street lights very well with no issues to get enough exposure when setting the iris fully opened, aperture f/1.9, and the ISO of the camera set to its native 800 ASA. The CinemaDNG RAW handles the Meteor lens very well in this low light environment. It also has a quite nice bokeh, at least nice enough although one can say that it handles bokeh with varying results.
 With an adapter (these are quite easy to come by thanks to the popularity of the camera) it can be fitted to various 16 mm camera bodies, also to digital cameras with a Super 16 sensor (such as the Blackmagic Pocket Cinema Camera, Ikonoskop A-Cam dII or the Digital Bolex) which gives them a filmic look to the recorded footage. Turning the focus ring, which is situated on the front of the lens, is quite smooth as the ring is well damped making it suitable for a focus pull arrangement. The zoom is adjusted or pulled with a lever attached to the side of the lens, with a detachable long extension rod screwed into the lever for easier and better zoom control and smooth zooming (a nice feature); it also gives the ability to pull really fast zooms for visual effect. But even without the rod the plastic lever itself is wide enough and has a ribbed pattern on it for the thumb and grip, enabling easy setting of the zoom. However, working without the extension rod pulling the zoom lever while filming creates some stutter to the zooming so it is recommended to use it. Like the focus ring, the aperture ring adjusts f-stops continuously stepless. The lens and all of the accessories were in mint (virutally new) condition when I received them. The price for this lens is umbelievable cheap; it’s virtually a steal.
 Cons: Working with the zoom lever, even with the extension rod attached, necessitates a lot of practice to get a smooth pulling as the lever isn’t particularly damped, or rather doesn’t seem to be damped at all, making it difficult to do a steady slow zooming creating jerkiness to the shots. Turning or pulling focus with the hand on the focus ring all the way from 2 meters (which is the minimum focus distance) to ∞ is quite ankward as the focus ring is quite large and takes a half turn, making it necessary to change the grip of the hand twice when focus pulling in a continuous movement; this creates jerkiness to the image, resulting in quite shaky footage, and necessitates a full camera rig with baseplate, 15 mm rods and follow focus arrangement. However, its front focus element barrel moves in and out when rotated which may become a obstacle when using a mattebox; it requires a really wide focus follow ring so that the follow focus cog doesn’t loose contact with its teeth. Also, the focus ring is quite heavy to pull. This might be due to old grease, or it may also be due to the ring constituting the entire front element barrell, creating inertia and resistance, and making smooth focus with a follow focus a challange. When pulling focus, a noticable breading is exhibited. It is a heavy lens, in particular for such a small camera as the BMPCC using the Micro Four Thirds lens mount, which is notorious for its wiggling fit. This necessitates the use of a lens support that holds up the barrell, relieveing the strain from the lens mount. The lens is very sensitive to flares which indicates that it has a poor anti-reflex coating on the lens elements. The Meteor has a very distinctive lens flare quality to it, easily provoking this effect in any strong light source; often showing the hexagonal iris of the lens. It totally blows away the image when pointing the camera directly towards the sun, making it evident that it cannot handle very strong light sources as the lens is to sensitive in this respect, making the low quality manufacture (i.e. lack of sufficient anti-reflective coating) evident. As with flare, which can be a pro as much as a con depending on your tastes and needs, the Meteor 5-1 exhibits some softness to the edges of strong reflections, i.e. blooming, but this has a pleasent look, adding to the vintage feeling. Although the Meteor does create a bright and warm cinematic image, making detail in shadows visible, it lacks somewhat in contrast giving it its flat and soft character. A major flaw with this lens, though, is the highly visible chromatic abberation at the edges, in particular with blue colours. Although it adds some character to the lens, it is an unwanted character.
 The Meteor 5-1 vignettes when used with a camera with a Super 16 sensor, such as the BMPCC which is optimised for lenses adapted to the wider Super 16 format (which originally had the gate size of 12.52 x 7.41). This is seen as dark corners (or even a crescent) at the left side of the image when the lens is set at 17 mm focal length which disappears from the image at around 25-30 mm (depending on the focus setting, aperture, etc.). This may be remedied in post production by a cropping of the standard 1.78:1 (16:9) image to at least the cinema aspect ratio of 1.85:1, which reduces most of the dark corners, alternatively by zooming the picture up to 20% or a combination of both; the aspect ratio of 2.39:1 would crop out the vignetting entirely. The best remedy is of course to keep the zoom outside of the vignetting focal lenghts; on my BMPCC the Meteor 5-1 vignettes on the left corners between 17-27 mm. It’s not the sharpest of lenses out there either. In particular it has issues with sharpness over very long distances on day shots when pulled to infinity, at least when aperture is set below f/8, which may be a sign of a lens abberation such as a spherical aberration or astigmatism (or perhaps a defect of the RafCamera M42x1-MTF lens adapter). I have never spotted this phenomenon when taking night scenes so brightness seems to enhance this infinity focusing issue. Original Russian tests conclude the following photographic resolution of picture (mm -1): At centre (y=0 mm) lens zoom position set at 17 mm = 68 lines per mm, and set at 69 mm = 58 lines per mm. At corner (y=5.5 mm) lens zoom position set at 17 mm = 25 lines per mm, and set at 69 mm = 38 lines per mm. This gives a somwhat soft image (which doesn’t need to be a con actually but something to be preferred for artistic reasons). That being said, I still enjoy the look of this lens much. I do like its softness, its low contrast and rich and warm take on the colours, which adds to the vintage filmic look of the movie.
Zenit/LOMO 16 OKS 3-10-1
 Brand: Zenit, KMZ (Krasnogorskiy Mechanicheskiy Zavod), LOMO (Leningradskoye Optiko-Mekhanicheskoye Obyedinenie).
Origin: Russia (SSSR).
Format: Regular 16 mm.
Lens Mount: Kinor-16SX-2M bayonet.
Camera: Zenit Kinor-16SX-2M.
Features: The OKS 3-10-1 prime lens is specified to a iris aperture of f/2.1. The iris ring adjusts f-stops in smooth steps from f/2.1 to 16 (2.1, 2.8, 4, 5.6, 8, 11 and 16). The focal lenght (F) range is 10 mm and focus is pulled smoothly with a thumbs grip with flaps, attached with screws to the focus ring. The front element of the lens is fixed.
 Accessories: There is a range of 62 mm filters especially made for LOMO OKS prime lenses; Neutral Density N-2x (one f-stop reduction) and N-4x (two f-stops reduction), plus colour temperature fiters K4500 (yellow), K6000 (orange) and K8000 (red). It is possible to combined several filters, such as both ND filters (NDx4x2) to stop down a total of three f-stops. A additional accessory that I have aquired for the lens is the Kinor-16SX-2 to MFT adapter from RafCamera who’s elongated shape is optimised for the OKS 3-10-1 which penetrates deep into the camera behind the mount, fitting cameras with the Micro Four Thirds lens mount such as the BMPCC.
 RafCamera Kinor-16SX-2 to MFT Adapter (with screws): I received the Kinor-16SX-2 to MFT adapter with screws for free from Rafael Pankratau of RafCamera, because the bayonet lock version of that same adapter didn’t fit my LOMO 16 OKS 3-10-1 f/2.1 10 mm. But the simpler version with screws fits as a glove! The lens is fastened securily with three allen screws, using the attached allen key. Rafael claims that the bayonet lock version isn’t a adapter which fits all 16 OKS prime lenses, as it has a removable back which may be adjusted with three screws. The simpler version is safer for use with the OKS primes (and possible for OPF zooms) since it has a longer inner space due to the absence of the removable back. The only complaint I have is that there was still some residues from the anodising black lacquer which rubbed off on my fingers, so I had to clean and polish the adapter with household toilet paper and some linen cloth before I could attach it to the lens. It has two grooves to chose from, when inserting the lens to the adapter; I chose the one which makes all important information on the barrel visible from above.
 Pros: The OKS 3-10-1performs well. Although the lens lacks some of the “character” that I have become used to with the Meteor 5-1, presenting a more neutral look, it may best be described as exhibiting both a soft and a sharp image at the same time. The result is very filmic. Moire is more visible with the OKS 3-10-1 compared to the Meteor, but the image never becomes analytical and razor sharp, providing a pleasent look. The viewing angle or field of view is great and impressive, simulating what my eyes see, giving opportunity to take very wide shots. Combining the OKS 3-10-1 with the Super 16 sensor of the BMPCC makes everything look larger than it does actually; it gives an intimacy to the footage. Although I haven’t done any dedicated tests of the shortest focus distance, I would say that it is approximately 0.5 metres, perhaps somewhat less than that. As a bonus, the lens produces some beautiful vintage lens flare, as well as shimmering of strong light sources. I will buy some kind of follow focus gear ring for the lens in the future and plan to apply it with superglue to the focus ring, and fasten the edges with the provided thumbs grip, using its screws; I don’t want to take away the flaps or the thumbs grip as they are quite practical when using the camera and lens in a run-and-gun fashion, to easily pull focus with the left hand thumb. The front element of the lens doesn’t rotate, which is a good thing if using matteboxes attached to the lens or certain filters. Although the OKS 3-10-1 has a clicked iris ring, it may easily be declicked by unscrewing the rear coil element or ring which holds two small metal balls and springs (see attached image), which now may be removed to be able to declick the iris ring. Another benefit from unscrewing the rear coil element of the lens is that this also helps to fit it to the RafCamera bayonet adapter (which I also own). However, I don’t find the clicks of the aperture ring to be particularly harsh but rather quite soft or smooth; it feels like the aperture ring is situated in a borderline between being clicked and declicked, and I find it quite possible that one wouldn’t notice a continuous stepping down or up of the aperture as anything else than smooth. So I will probably leave it as it is, at least for now.
 Cons: When mounted to the MFT mount of the BMPCC, through the adapter, the flaps (thumbs grip) of the focus ring goes all the way around the barrel, underneath it, which would make it ankward to use if and when applied to a base plate with 15 mm rods. Being a 10 mm, the lens vignettes quite heavily on both sides (not just the corners) and there is obvious barrel distortion (but that should be expected from a 10 mm lens on the BMPCC); it almost looks like a fish-eye. Either cropping 2.40:1 or zooming in post, or both, does the trick with the vignetting. On the BMPCC, infinity focus is found before the infinity symbol hits the mark, rather somewhere at the 1 meter mark. When I push focus beyond 1 meter the image loose focus again. On the Kinor-16SX-2M infinity corresponds with the infinity symbol. This could be a sign that the flange focus distance (FFD) is to far off on the MFT adapter. However, it has been stated that this nonalignment of the focusing markings is to be expected with the OKS line of leses, when used together with RafCamera adapters, and that wider lenses need more precise shimming. It is reccomended to try to add 0.1 mm or thinner shims from foil or Oracal tape. The aperture ring is clicked in stop increments of 2.1, 2.8, 4, 5.6, 8, 11 and 16 f-stops. On my lens the red dot, that ought to be reserved for the f-stop clicks (as the f-numbers on the aperture ring are painted in red), halts somewhere in between 2.1 and 2.8 (2.4?), and continues somewhat beyond f/16, to a point equivalent to f/32, i.e. up to two stops more. However, there is a white dot next to the red which corresponds exactly to the f-stop clicks. So in conclusion, although I have no idea if this was intentionally designed or not, it seems that on my lens I should use the white dot for f-stop orientation, and that the lens has a dynamic range of 6 stops. Unfortunately, one of the ND filters seems to have been somewhat damaged with visible air bubbles between glass elements. Also, the lens itself has a smudge or stain on its rear element that is hard to remove entirely, small enough not to be noticed in most situations. However, when the smudge is seen, as when a bright light source hits the lens, it may be visible in the left upper thirds of the image, looking almost as a a flare (which it is not). There is some chromatic abberation exhibited on the lens on the blue and red wavelengths, mostly seen against a very bright background and in particular when out of focus. (See image to the left in two parts, with a red line making a division between the 100% or standard non-magnified image to the left and a 200% magnification to the right to make it easier to clearly spot the chromatic abberations created by the lens.) Aside from vignetting and the mild chromatic abberation, I’m still quite satisfied with the lens.
Rigs
POOLiCAGE Half-Cage for BMPCC and SmallRig 1638 Top Handle with Cold Shoe Base
 Brand: POOLi™ and SmallRig
Origin: Russia (POOLi™) and China (SmallRig)
Type: Camera half-cage with 1/4″ – 20 mounting threads and cable clamps, designed by Andrey Kramar, with third party top handle and cold shoe base with an additional set of 1/4″ – 20 and 3/8″ mounting threads
Features: Half-cage design that properly exposes the grip of the camera body, all of the buttons, and lid for the battery and flashcard reader compartmet. Complete covering from the side, top and bottom of the centre and left-hand side of the camera body, including the MFT lens mount. Ten 1/4″ – 20 mounting threads that are evently divided between the top and bottom. Protective cable clamps for all five connections, with a two opposite screw solution that is easy and quick to use. A very simple construction, with three large parts joined by four allen screws attached to the side section. Constructed from lightweight Russian D16T aluminum alloy, coated in a anodising black lacquer after CNCing. BMPCC fitted to the cage using two provided 1/4″ – 20 allen screws to their corresponding bottom and top mounting threads on the camera.
Accessories: The SmallRig 1638 Threaded Top Handle with Cold Shoe Base, mounted to the POOLiCAGE half-cage using two 1/4″ – 20 allen screws with a provided allen key. The adjustable space between two 1/4″ – 20 screws is 30-40mm on the SmallRig Cold Shoe Base which fits the distance (32mm) between the 1/4″ – 20 threads of the POOLiCAGE. The Top Handle is fitted to the Cold Shoe Base with four M4 allen screws, which can be unscrewed using an allen wrench to disassemble the handle from the base. Apart from the cold shoe on top, the SmallRig Cold Shoe Base features the three 1/4″ – 20 female threads. Additionally, the 113 mm long and hollow top handle provides for 20 3/8″ and 24 1/4″ – 20 female threads, evenly distributed on all four sides.
 The SmallRig 1638 Threaded Top Handle with Cold Shoe Base: I ordered the top handle and base confident that it would fit the POOLiCAGE, based on the official stats. Thankfully, considering that the products come from two different companies and adapt to different ecosystems, the cold shoe base fits just perfectly to the half-cage, although it procrudes somewhat from the edge of the cage. Looking at the assembly and comparing the cage with the handle, it is easy to spot the difference in finish quality; the POOLiCAGE looks rough and home made compared to the smooth surfaces of the SmallRig components. The adonising process of SmallRig components seems to be more adhesive and endurable compared to the adonising of the POOLi™ products, which easily comes off with wear, showing the aluminum beneath, almost as they were brush painted. However, both products have a matte finish which blends quite well, and SmallRig and POOLiCAGE combo looks really neat together, as if they were made for each other. Mounted to the POOLiCAGE, the SmallRig handle tends somewhat downwards, because of the top part of the cage being slightly misaligned to the side part, with its female tappings less then perfectly aligned to the screw holes of the side piece. Apart from the 1/4″ – 20 threads on the SmallRig Cold Shoe Base (as well as the cold shoe), the multiple 3/8″ and 24 1/4″ – 20 threads on the handle make up for the relatively few 1/4″ – 20 threads on the POOLiCAGE.
 Pros: A good, simple and aestetically pleasing design; a solution that gives the freedom to hold the BMPCC by the grip of the camera body and at the same time to provide with enough 1/4″ – 20 threads to mount future accessories as well as protection of the camera connectors. The component parts of the cage are all very securily fitted, and didn’t require rescrewing upon delivery. The cable clamp screws are nicely provided with lage plastic knobs at the front of the cage that are salient for easy screwing and unscrewing; the back of the cage sports smaller scews that are aligned to the cable connections with one of the provided allen keys. The 0.7 mm 12V DC power connector, provided with the BMPCC, fits with enough room, which is a good indicator as the plug is quite thick. The connector to one of our mics has also been clamped, with good result. A good feature is that the top and bottom parts of the cage procrudes at the front, perfectly aligning with the Micro Four Thirds lens mount, which provides with protection of the MFT mount. The cage itself feels lightweight but the aluminum alloy construction feels very strong and rock solid. Russian manufacture tradition which prefers simple and rugged design before complexity. Robust and thick frame made of high quality aluminium alloy (Russian D16T aluminum alloy which is supposedly of high quality and envied by the West), that may withstand heavy handling and is superior to anything else that I have seen. Extreme affordability combined with good quality.
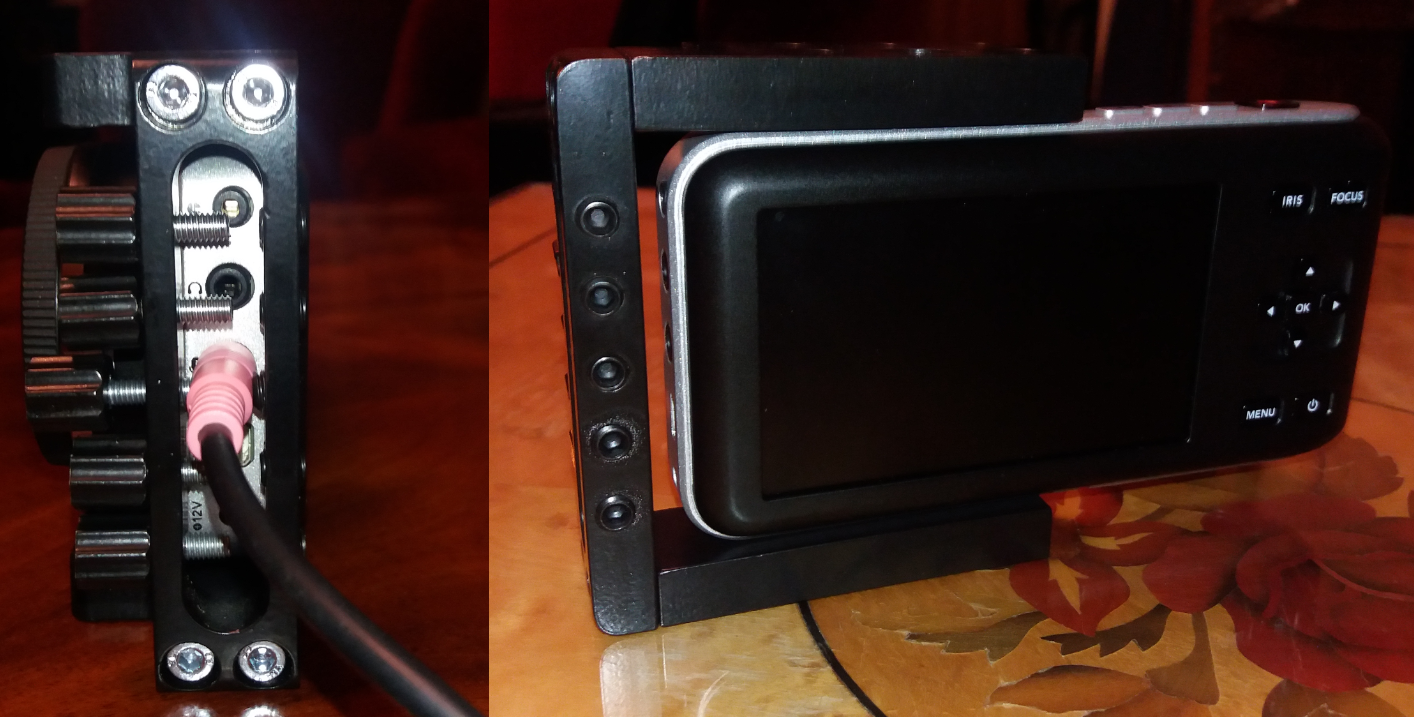 Cons: The fit is more or less tight and snug, although there is some play on the top that is perhaps not more than one milimetre. Screwing the allen screw all the way and tight makes the cage sit fixed on the camera, but it seems that the top 1/4″ – 20 thread is raised somewhat from the camera body, aligning it to the underside of the top part of the cage, which might make the thread to loosen up or come off in the future. However, in field conditions when pushed hard, the entire camera can move or spin slightly around its 1/4″ – 20 screw threads, inside the half-cage. One of the few downsides of the robust POOLiCAGE is that it doesn’t have any anti-skid functions built into the design, such as procruding pins that stops the camera body or non-skid pads. I have tried to remedy this weekness, with seemingly good results, by applying a circular Ø 18 mm rubber non-skid pad that have had a whole cut in its centre with a scalpel, big enough for the 1/4″ – 20 allen key to attach the cage to the bottom mounting thread of the BMPCC.
  It seems as the tread that fits the clamp for the Micro-HDMI is somewhat skewed, but only marginally so and not to much to create a problem. The clamp screw attached to the Micro-HDMI thread also seemed to have a somewhat crooked knob, so it changed places with another screw which was more straight. So it seems that Andrey Kramar taps each thread by hand, and sometimes not 100% straight and aligned to the other threads. Also, a quick fitness test of each of the ten 1/4″ – 20 threads of the cage, using a Manfratto 3/8″ to 1/4″ adapter, shows that there is quite some play which varies sometimes between threads, however not to large of a play; this is rather a positive thing as it will become easy to apply the screws from various accessories and base plates when faced with stressed production situations on location. However, a total of ten 1/4″ – 20 mounting threads is a bit sparse. The finish is somewhat blemished with small dimples or miniscule pits, and some traces from CNC machining. The anodising looks god, though, and evens out much of the irregularities on the surfaces. Despite its flaws, this is a very satisfying design, which surpasses that of SmallCage and WoodenCamera; although the latter two present more mounting threads and better finish, they don’t seem to be as solid and heavily armored as the POOLiCAGE. Although it shares several of its features with its various competitors, non of the other brands and models have all of them joined together in the same product, making the POOLiCAGE a superior design, if finish and exact precision is not to be a major consideration.
Shoulder Rig based on the POOLi™ D-BASE-2 Base Plate, Krasnogorsk-3 Pistol Grip and Shoulder Brace, and SmallRig 1622 Rubber Non-slip Handle Grip and 1087 Rod Clamp
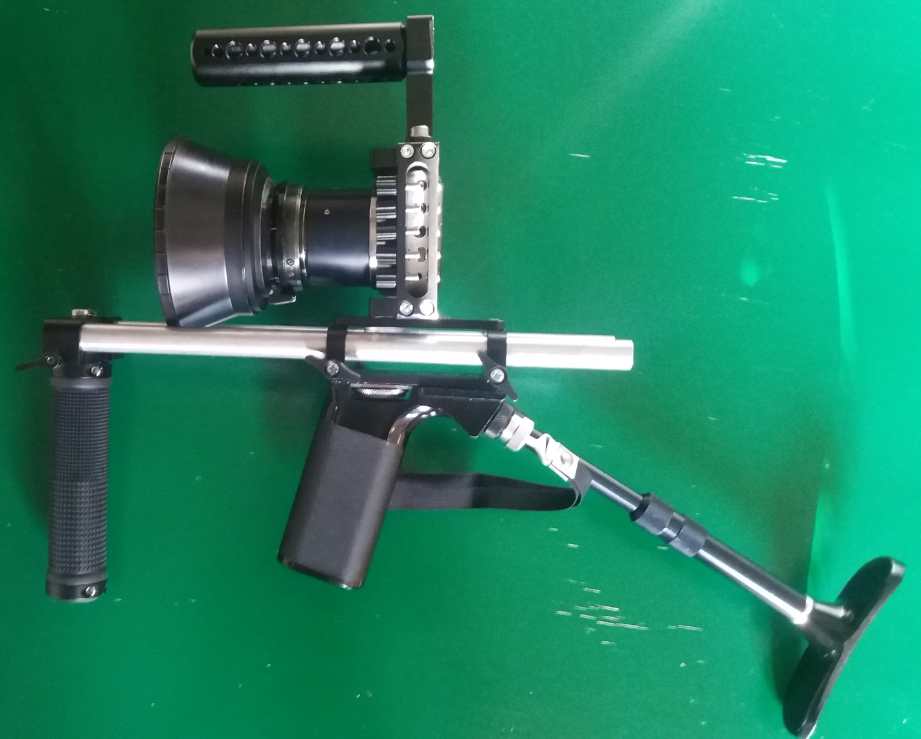 Brand: Zenit (KMZ, Krasnogorskiy Mechanicheskiy Zavod), POOLi™ and SmallRig
Origin: SSSR, Russia and China
Type: DIY camera shoulder rig with a base plate, having a 1/4″ – 20 mounting screw, and 1/4″ – 20 and 3/8″ mounting threads for pistol grip, and Ø 15 x 60 mm rod clamps, as well as a pistol grip with telescopic shoulder brace, and a forward handle attached to the Ø 15 x 60 mm rods
Features: A 35 cm high aluminum alloy base plate from POOLi™ with a top plate that has a pair of non-skid pads on each side of a groove, featuring a sliding 1/4″ – 20 screw for mounting on one of the bottom 1/4″ – 20 threads of the POOLiCAGE, and a bottom plate with three 1/4″ – 20 threads and one 3/8″ thread for mounting the pistol grip. The base plate has a simple arrangement with fixed pairs of rod clamps, adapted to the Ø 15 x 60 mm rails system, that secure each 15 mm rod with knobs. The SmallRig 1622 Rubber Non-slip Handle Grip is attached to the forward section of the rails using the 15 mm Rod Clamp of the SmallRig 1087 Long Lens Support (with the actual lens support piece removed), to create a second grip for the left hand. The forward handle is made from a aluminum frame, with the non-slid rubber grip glued unto the frame, with each end  disclosing the metal, one end sporting a 1/4″ – 20 female thread in the centre, surrounded by four M4 female threads, the other only having a plain aluminum end with no threads or anything of interest; each end is circumscribe by a aluminum ring which is fastened with one M4 allen screw. The SmallRig 1622 Grip is attached to the SmallRig 1087 Rod Clamp using the SmallRig 1795 1/4″ Fixing Screw with D-Ring, threading it first through the top portion 1/4″ – 20 female thread, after which it is allowed to procrude out from the 3/8″ female thread at the bottom of the rod clamp, being screwed to the 1/4″ – 20 female thread of the rubber grip. The Krasnogorsk-3 backelite Pistol Grip is mounted to the D-BASE-2 3/8″ female thread. The aluminum plate of the K-3 grip that attaches to the bottom of the K-3 camera originally has two pins to hold the grip in place, withouth it wiggling around; the rear pin of the grip fits right into one of the 1/4″ – 20 thread holes of the D-BASE-2, whereas the front pin fits into the base through a hole that I have drilled myself, using a DREMEL and a 3 mm cutting tool. The K-3 aluminum telescopic Shoulder Brace is attached to the pistol grip, using its 3/8″ screw, extending the stock to its fullest extension. The K-3 Hand Strap is attached to the shoulder brace 3/8″ screw (which sports a female 3/8″ thread dedicated to the hand strap) through its own 3/8″ male screw, for additional support.
Accessories: A pair of 30 cm long 15 mm rods (silver metallic) made by POOLi™, lacking anodising laquer being raw and grinded. A hand strap taken from the Krasnogorsk-3 kit, which attaches itself to the shoulder brace using a 3/8″ screw.
 Pros: The D-BASE-2 is especially aquired to work together with the Krasnorogsk-3 pistol grip (and telescopic shoulder brace), which features a 3/8″ screw. The silver metallic 15 mm rods don’t scratch that easily from use, clamping various accessories to the rails. All POOLi™ products are freshly made by Andrey Kramar himself, using high quality and modern automatised computer based CNC machining techniques. The raw matter is taken from Russian D16T aluminum alloy, supposed to be of high quality and envied by the West, the base plate being coated in a anodising black lacquer after CNCing. Andrey’s design follows an old Russian manufacture tradition which prefers simple and rugged design before complexity. The D-BASE-2 leaves ample room for the lid to open while mounted to the Fancier FC-02H fluid head, enough for the battery and card to be extracted from the camera. This means that I can use it also with the with the Fancier FC-270A tripod and FC-02H fluid head in a secondary role (which is good as very high bases may pose problems for the counterweight feature of the fluid head). The K-3 pistol grip has the perfect size and alignment of its screw to the 3/8″ thread of the bottom plate of the D-BASE-2. The fully assembled shoulder rig feels really firm in my hold, using both of my hands; it feels natural and comfortable. The backelite pistol grip and shoulder brace combo sits quite firmly to the D-BASE-2, although there is some slight wiggle along the axis of the thread, necessitating me to firmly rescrew the 3/8″ male thread a couple of times; but it never detaches or unscrews itself entirely. Holding the rig with both hands on both grips, no unwanted movement is noticable; it only happens when doing unnatural movements, placing the entire weight on the pistol grip, etc. With the top handle of the half-cage attached I can vary the position of the left hand, between the top handle and forward handle, always holding the rear pistol grip by my right hand, with the hand strap placed around my wrist for protection in the case that I would accidently drop the rig from both of my hands. This DIY shoulder rig is extremely affordable, although it takes some effort to get it working properly.
 Cons: The aluminum alloy base plate feels lightweight and solidly strong, although its finish is somewhat blemished with small dimples or miniscule pits, and some traces from CNC machining. The anodising looks god, though, and evens out much of the irregularities on the surfaces. The adonising process of POOLi™ products isn’t particularily adhesive and endurable as it easily comes off with wear, showing the aluminum beneath, almost as it was brush painted. Unfortunately the original 3/8″ screw of my copy of the Krasnogorsk-3 pistol grip is slightly overzied. Combined with the fact that the 3/8″ female thread is a bit narrow, a indication that the actual threads of POOLi™ products may differ slightly within the same standard, it is impossible to mount the K-3 pistol grip screw into the thread of the D-BASE-2. I was forced to purchase another 3/8 screw, the Manfrotto 088LBP Female 1/4″ – 20 to Male 3/8″ adapter with flange, which was the only 3/8″ screw with wide enough flange to fit the pistol grip that I could find searching all over the Internet. Although being tight, the new Manfrotto adapter fits the S-BASE-2 3/8″ thread well, and after some screwing and unscrewing the thread on the base loosened up somewhat, fitting the adapter better. The old screw of the K-3 grip is easy to remove and replace, as it only requires me to unscrew a aluminum plate fitted with a hole for the 3/8″ thread; it takes five small (M4?) screws to make the swap between the two 3/8″ flanged screws. I had to remove the circular non-skid pad on the adapter to make it screw well enough unto the 3/8″ thread of the to the D-BASE-2, although it made it somewhat more difficult to screw it tight as it is so thin. The Manfrotto adapter flange screw more or less attaches as tight to the D-BASE-2 as it did prior to my modification. However, there is a small revolving play between the K-3 grip and the D-BASE-2 as the rear pin of the aluminum plate of the grip moves freely inside the 1/4″ – 20 thread whole.
  So I have applied black adhesive and elastic rubber non-skid pads in two sizes, Ø 12 and 18 mm, 1.8mm thick; I have applied a total of four non-skid pads to the aluminum top plate of the Krasnogorsk-3 pistol grip to enhance its non-skid feature, one each of the Ø 12 and 18 mm diameter size, a second of the larger size but cut into half using scissors to make it fit optimally, creating a crescent shape, and also a third Ø 18 mm non-skid pad with a hole cut though it with a scalpel, encircling the 3/8″ male thread. These pads rise quite substantially from the top portion of the grip, although I have applied them to the depressed plate. When mounting the Krasnogorsk-3 pistol grip to the underside of the POOLi™ D-BASE-2, using the 3/8″ screw, there is a gap visible and the screw doesn’t turn inside the 3/8″ female thread of the D-BASE-2 all the way. Although slightly thinner pads would have been more optimal, these will have to do as they create a good enough effect, and the 3/8″ flange screw is still screwed far enough. Even though not removed entirely, the sideways play is markedly less compared to without pads. Because of the thickness of the pads, the pins arent’t as salient as before, making the fit into the DIY drilled hole of the underside of the D-BASE-2 not as decisive as without pads. But it still attaches to the hole good enough to stabilise the grip. As the pads create a natural damped counter action, this makes the attachement between the grip and base more pronounced. However, the joint feels more flexible and slightly movable, as is expected from a rubber dampening. Locking the flange screw far enough minimises this flexibilty, but doesn’t remove it entirerly. Combining the POOLiCAGE with the D-BASE-2, screwing into the forward 1/4″ – 20 thread of the underside of the half-cage (necessary to align it to the rods system), creates a peculiar and unwanted result as the thick rubber non-skid pads makes the cage tend slightly downwards; moving the cage somewhat further back on the base mitigates this problem, almost levelling the axis, but may pose some problems with short lenses such as the OKS-3-10-1 if using a follow focus.
POOLi™ S-BASE-2 Base Plate
 Brand: POOLi™
Origin: Russia
Type: Camera base plate with 1/4″ – 20 mounting screw, and 1/4″ – 20 and 3/8″ mounting threads for tripod, and height adjustable Ø 15 x 60 mm rod clamps, designed by Andrey Kramar
Features: 80 cm high aluminum alloy base plate with a top plate that has a pair of non-skid pads on each side of a groove, featuring a sliding 1/4″ – 20 screw for mounting on one of the bottom 1/4″ – 20 threads of the POOLiCAGE, and a bottom plate with three 1/4″ – 20 threads and one 3/8″ thread for mounting on a tripod head’s sliding quick release plate. It has a pair of rod clamps adapted to the Ø 15 x 60 mm rails system, sliding up and down along grooves for height adjustment, each being secured to the base with a knob.
Accessories: A pair of 30 cm long 15 mm rods (silver metallic) made by POOLi™, lacking anodising laquer being raw and grinded.
 Pros: The S-BASE-2 is mainly reserved for use together with the Fancier FC-270A tripod and FC-02H fluid head (and in a secondary role with a shoulder rig arrangement), as an easy access for the battery / flash card compartment lid of the BMPCC is necessary, to be able to replace batteries and SDXC cards while having the camera mounted to the tripod head and in locked position, something it manages without any remarks even with its rods adjusted to its highest position without hindering battery and card replacement. Another good thing about the S-BASE-2 is that each pair of rod clamps is indivudually adjustable, allowing more flexibility with different sets of rods (such as a forward pair for the lens and a rear pair for a shoulder rig arrangement). I prefer the silver metallic 15 mm rods instead of adonised from both aestetical considerations, as well as practical, as anodised finish would easily become scratched from use, clamping various accessories to the rails. All POOLi™ products are freshly made by Andrey Kramar himself, using high quality and modern automatised computer based CNC machining techniques. The raw matter is taken from Russian D16T aluminum alloy, supposed to be of high quality and envied by the West, which is coated in a anodising black lacquer after CNCing. Andrey’s design follows an old Russian manufacture tradition which prefers simple and rugged design before complexity. Extreme affordability.
Cons: The aluminum alloy base plate feels lightweight and solidly strong, although its finish is somewhat blemished with small dimples or miniscule pits, and some traces from CNC machining. The anodising looks god, though, and evens out much of the irregularities on the surfaces. The adonising process of the base plate isn’t particularily adhesive and endurable as it easily comes off with wear, showing the aluminum beneath, almost as it was brush painted. Combining the POOLiCAGE with the S-BASE-2, screwing into the forward 1/4″ – 20 thread of the underside of the half-cage (necessary to align it to the rods system), creates a peculiar and unwanted result as the thick rubber non-skid pads makes the cage tend slightly downwards; moving the cage somewhat further back on the base mitigates this problem, almost levelling the axis, but may pose some problems with short lenses such as the OKS-3-10-1 if using a follow focus. This phenomenon makes the use of a lens support even more critical when using larger and longer lenses, such as the Meteor 5-1, helping to level out the horisontal axis.
Tripods
Fancier FC-270A Tripod and FC-02H Fluid Head
 Brand: Ningbo Fancier Photographic Equipment CO., LTD.
Origin: China.
Type: Professional DV Support with Fluid Head
Features: Folded togheter, the tripod and head is 75 cm long and almost 13 cm wide, not counting the handle which is 38 cm when folded. The entire support is heavy, being spedified to 4.4 kg. It is entirely made of black aluminium metal; only the center parts of the knobs and the feet are made of rubber. One of the legs hosts a spring wire made of nylong and a plastic hook, long enough to cover the entire circumference of the folded tripod; it’s probably there to secure the tripod when folded so that the legs doesn’t accidently open. When the wire is released, its springs back into the leg and the spring is strong enough to hold the legs secure in a steady grip. The Fancier FC-270A tripod consists of a two stage set of aluminium legs, the first two stages of each leg depending on twin rods or hollow pipes, and the last stage on a single rod. Each stage is measured to the following operating heights, counting from the rubber feet to the baseplate of the head: 71 cm (minimum), 114 cm (medium) and 156.5 cm (maximum). Each stage is secured by a metal knob which turns 3/4 of a turn to a full stop, securing each stage firmly. Level with the joints of the first stage, the all metal spreader is attached with sealed screws to the tripod leags, extending itself easily pushing it down and folding with a simple push upwards; its function is to secure the legs and to stabilise the tripod. The FC-27A feels quite reasonable tall with the FC-02H head mounted to it; the reseller specifies it to 155 cm (61 in), but I actually measured it 1.5 cm higher than that (for a total of 156.5 cm or 61.5 in). With the Blackmagic Pocket Cinema Camera mounted to the FC-02H baseplate the lens falls just below the height of a person being 1.90 cm (6 ft 3 in) tall), and with a proper cage and additional rod adapter it will be approximately along the height of his eye level. FC-02H head has a standard slade type quick release baseplate that is numbered in millimeters. The baseplate features a sliding arrangement along a elongated opening or groove where a smaller movable slade is attached with three 1/4″ – 20 threads, of which one has a 1/4″ screw mounted to it and one other a spring adjusted pin for extra support to keep the camera firmly attached in place. The smaller slade is fixed firmly to the baseplate when screwed onto the camera bottom thread. The baseplate slade is easily slided onto the quick release rail of the head from behind and in the direction of the camera lens, automatically activating a safy lock that prevents it from falling off backwards (it cannot be dismounted forwards); when dismounting the quick release baseplate a button is pressed on the left side to open the locking mechanism when drawing the slade backwards. The baseplate slade is securely locked to the rail (preventing sliding) with a small knob on the right side of the head.
 The entire FC-02H head is shaped as a ball fitted to the concave mount on the FC-27A base which is opened at the bottom to allow a large lever to procrude from the ball head through the concave tripod mount; the lever sports a large locking knob when loosened allows the entire head to move around tilting in every direction, to adjust for horizontal levelling and when fastened lock the head securily. The FC-02H has a built-in spirit level as an aid when finding a horizontal level. The FC-02H is only delivered with one single telescopic handle which attaches easily and quickly to the back of the head with a standard rosette and locking knob arrangement. The head sports two rosette mounts to accomodate for a second handle or to change the position of the single telescopic handle according to preference. Unscrewing a locking screw on the pan handle makes it possible to extend it considerable (up to 59 cm) to enhance panning and tilting. The manufacturer states that the FC-02H head is of the fluid type and it certainly behaves as such. The FC-02H has adjustable pan and tilt controls in the form of two locking knobs on the left side of the head, one smaller near the base of the head which controls pan and one larger closer to the baseplate which controls tilt. The load capacity is specified to 6 kg. The tilt sports a counterweight feature which is set with a locking knob on the right side of the head; one simply unlockes the knob, tilts the head with the mounted camera to a level position and locks it again. If the lens is large and weights a lot one has to tilt the head slightly backwards before locking the knob. When tilting the head forwards or backwards, it reverts to its level positon with a smooth movement which can provide really fine tilts on camera. The tilt has a span between -65° and +90°, which means that it is possible can tilt it all the way forwards until the lens hits the tripod, and all the way backwards until it is almost vertically level.
 Accessories: A black carry bag made of nylon, with one plastic zipper that covers the top and goes along the length of the bag, as well as sporting twin zippers that opens up one of the ends of the bag (reserved for the tripod head) along the circumference, meeting with the main zipper at the top, which opens up the bag wide enough for the tripod to be picked out easily. Opening up the carry bag one finds the tripod and head being secured by two nylon straps that are fastened with quick release plastic buckles. Although not being fully shock absorbent and water reistent, the sides and ends of the nylon carry bag are quite well padded, and the bottom has an even thicker removable padding. The nylon fabric protects the tripod against rain. One of the sides hosts a zipped pocket on the inside of the bag, long enough to hold the tripod head handle and a simple user’s manual. The head is secured on delivery by a thick circular black foam shock absorbent that it is well to save for a safer protection of the head while being placed in the carry bag during transportation to a shooting location.
 Pros: Good reputation; overly positive reviews were the FC-270A is generall hailed as being a very good tripod for the price, and the FC-02H as an even better head for professional style panning and tilting. The tripod and head have a great finish and everything seems being of good build quality. The locking and unscrewing mechanism of the tripod leg knobs is very simple and fast in its operation, and although some of the knobs turn somewhat more sluggish compared to others, they all extend the legs with a secure lock. It seems that Fancier has made the FC-270A taller over the years and that I have bought a late edition of the tripod that bosts 156.5 cm (61.5 in), with early reports specifying it to 135 cm (53 in). As with the rest of the FC-02H head, the quick release baseplate has a high build quality and excellent function. The lockable ball joint and lever feature of the FC-02H head allowing it to move around tilting in every direction, to adjust for horizontal levelling, is great especially when the tripod is placed on sloping or uneaven ground; the built-in spirit level is a usable aid in finding a horizontal level. The possibility to extend the telescopic handle makes up to 59 cm is a great feature which makes panning and tilting easier, more precise and smooth.
 The pan feels really smooth with the Blackmagic Pocket Cinema Camera mounted on it and never jerks when starting or ending a pan, which is a great feature considering the price, and adding a cage and full rig will make the heavily damped panning feature feel even more adequate. With the camera mounted to the head it is possible to do quite fast an irregular moves without affecting the tripod. With the telescopic handle extended the apparent slugginess of the pan really comes to its right, preventing any shakiness to the tripod. The tilting span between -65° and +90° is more than enough for anyones needs. The nylon carry bag seems to be much more well made and actually functional than is to be expected for such a price tag, having quite well padded sides and ends, and bottom. The bag can be opened wide enough at one of the ends for the tripod to be picked out easily, which is a good thing as the tripod is quite large coming out from the bag. All in all, the Fancier FC-270A tripod / FC-02H fluid ball head combo is a extremely cost-effective and valuable support for the Blackmagic Pocket Cinema Camera. I have done a lot of tilting and panning with the BMPCC and Meteor 5-1, also in the field as a cinematographer, together with the FC-270A / FC-02H. I must say that I am more than pleased with the results. It is easy to assemble and set up in a couple of minutes. The FC-270A tripod feels stable and robust. The FC-02H fluid ball head feels smooth and functional. The entire package is light enough to be carried by foot long distances to a shooting location. The bag protects the tripod and head well enough. The overall impression is professionalism which matches the bang for the buck factor of the Blackmagic Pocket Cinema Camera.
 Cons: While the major zipper works smoothly and flawlessly on the nylon carry bag, the smaller at the end run somewhat slow and partly uneven in its teeth; there is a potential breaking of one of the smaller zippers, preventing me to use the small zippers entirely to prevent damaging the bag. This is one of those things that is to be expected from buying cheap products made in China. It isn’t possible to unmount the tripod spreader easily without screwing off the sealed screws, prohibiting really low camera positions below 71 cm; for that you will need to buy a different tripod for low angle camera workings. The only part of the tripod leg knobs not being of metal are the rubber center-pieces (who have no actual function beyond cosmetics) on the knobs, which seem not to be securily fastened as there is some visible play; they are easily pushed back into position but could potentially be lost in the field. Although the reseller stated that the baseplate would host both a 1/4″ and a 3/8″ screw, mine lacks the latter. The spirit level is not backlit (hardly surpringing considering the price) which necessitates the use of a flashlight during late eveing and night shots. Also, the spirit level is quite small so it is a bit ankward to see it properly even in daylight for a farsighted fellow as myself.
 The pan feels really sluggish by itself and the tilt feels a lot lighter compared to the pan, and initially this may feel a bit queer and slightly disorienting when doing a combined panning and tilting, but the extra camera weight makes the difference less pronounced and I guess one gets used to it. When doing extremely fast and violent pans one may experienced movement of the tripod, with even one of the legs lifting, but it isn’t really a big issue when the camera is mounted on the head. With the Blackmagic Pocket Cinema Camera attached to the baseplate and mounted on the FC-02H, there is no possibility to open up its battery terminal lid and change batteries while mounted, not even make a wide enough opening to extract the SD card; the only solution is to dismount the camera with the quick release which is done in seconds. However, it would be nice in the future to change either the battery or the SD card, or both, without risking to affect the camera position if the battery or SD card runs out in the middle of a shot. To be able to do that one has to aquire one of the many cages and rod adapters specifically made for the Blackmagic Pocket Cinema Camera, which provides enough headroom for the terminal lid to be opened fully. This fact necessitates an investment of a full camera rig.
Vintage Camera Tripod and Head
 Brand: Unknown. There are no brand markings.
Origin: Unknown. Probably made in Europe and well before the 1950’s. Possibly manufactured during the 1930’s or 1940’s.
Type: Camera Support with with Pan/Tilt Head.
Features: Vintage or antique type of tripod made of wood and aluminium, with an iron metal pan and tilt head, and handle. Made primarily for stills photography, or possible for consumer 8 mm or 16 mm filming. The tripod consists of a two stage set of legs, the first stage of each leg is made of aluminium and is hollowed out like a rail, and the last two stages are made out of wood, with the middle section being hollowed out to host the thin and lowest leg section. When folded together the last two sections fit into the aluminium section rail. The leg knobs are flat and small, only fitting the thumb and index finger, and are made of aluminim metal. The points of the feet are spiked. The height of the tripod may be adjusted by varying the lenght of each section with the screws, and by varying the spread of legs legs. The base of the tripod itself is made of wood and onto it is glued a circular piece of leather for protection, onto which is mounted the head. The black all iron metal head has a large aluminium knob screw at the base which when loosened makes the entire head to pan. The short handle unscrews and fastens the tilt function of the head. The baseplate of the head is circular with a chromed surface, sporting a 1/4″ – 20 screw which is fastened or loosened with a large screw wheel just underneath the baseplate.
 Pros: This vintage tripod is good enough for fixed camera positions with either the Zenit Quarts 1x8S-2 or the Blackmagic Pocket Cinema Camera. (I have used both cameras with the tripod in actual shooting, as the 1/4″ screw fits both.) Fixing the tilt is quite easy done with the screwing feature of the handle. Fixing the camera to the mount is also easy and quick, as the 1/4″ screw has a large wheel which simplifies the operation. It is possible to change both batteries and SD cards while the BMPCC is mounted on the tripod, as well.
Cons: The support has a shaky mount between the tripod base and head (the screw that holds them together is a bit ankward to get tight), and the head itself doesn’t do well with panning and tilting in camera (which isn’t required in still photography), creating lots of jerking, as it is not fluid or damped in any way. In particular the panning is ankward as it feels that one is forcing the camera to move with lots of abrasiveness. As with all vintage tripods, this one lacks a spreader which makes the support more unstable compared to a modern tripod. My 16 mm film cameras (the Krasnagorsk-3 and Kinor-16, especially the latter) are to heavy for the tripod and as they have 3/8″ thread mounts they don’t fit the baseplate. The spikes at the feet perhaps have their place in outdoors shooting, but indors they are misplaced; to secure the tripod to the floor one has to press them somewhat onto it, if it is made of wood, which will damage it. On a concrete floor, or outdoors on asfalt or rock, the tripod stands unsecured compared to a modern tripod with rubber feet. Thus, it will probably have a very limited (or no use at all) in our future movie projects.
Accessories
Clas Ohlson Instrument Hard Case

Brand: Clas Ohlson.
Origin: Sweden, China.
Type: Instrument Hard Case.
Features: Water and dust resistant, as well as shock absorbing “pelican style” safe case for cameras, tools, instruments, etc. Comes in two sizes and one of each size has been aquired. The mid size version (with article number 31-4142) measures 43 x 38 x 16 cm and weighs 3.2 kg, being made of heavy duty black plastic. The insides measure 39.5 x 32 x 11.7 cm and carry 4-layer shock-absorbent foam rubber lining inserts, of which two have a precut diced pattern for picking and plucking, making cutout easy to accomodate the equipment. The large size version (with article number 40-8470) measures 51 x 41 x 20 cm on the outside and 48.5 x 35.5 x 18.6 cm on the inside, weighting 4.3 kg. Whereas the bottom and top packing has a thicker lining compared to the mid-sized instrument case, the two precut lining inserts have the same thickness, giving a couple of centimetres headroom to the edge of the bottom part of the case, although their size is larger to accomodate the volume of the case. Both versions share equal features, thus. The lid has a rubber packing to keep out the water and humidity. The lid and the bottom of the hard case has a lining in the form of small cones which keeps everything pressed down in place. The case lid closes smoothly, tight and secure, and has snap locks for easy locking of the case. The corners also have a hole, each prepared for padlocks. It seems to sport a automatic pressure valve system. The case handle is rubberized, distinct from the heavy duty plastic, which creates a pleasant and comfortable feel to the hand while carrying the case; the entire hard case with all of the equipment stored inside gives a quite heavy feel.
 Pros: The mid-sized version is a perfect case to carry not only the BMPCC chassis with cage, but the Meteor 5-1 lens and attached zoom lever rod, OKS 3-10-1, filters and lens hood, as well as batteries (several of them), battery charger and cables, BMPCC power supply, SDXC flash memory cards, and the Sekonic L-398 light meter. The large version has a size enough to carry my complete camera rig, both for tripod and shoulder, for safe transportation and storage of the Petroff MatteBox and Follow Focus, the POOLi™ S-BASE-2 and D-BASE-2 base plates, with the twin 30 mm aluminum Ø 15 x 60 mm Rods, the SmallRig 1638 Top Handle Cold Shoe Base and Threaded Top Handle, 1622 Rubber Non-slip Handle Grip with 1795 1/4″ D-Ring Fixing Screw, and Long Lens Support with 15mm Rod Clamp, as well as the Krasnogorsk-3 Pistol Grip with telescopic Shoulder Brace and Hand Strap. The cutout of the foam lining inserts is easy because of them being perforated in one centimeter cubes; it just takes some pulling with the fingers without the need for a knife. Clas Ohlson offers spare foam lining inserts which may come handy in the future if I decide to make some rearrangements. The top layer was cut out first so that the camera chassis, lens, filters, zooming rod, charger, power supply, batteries, light meter, and lens hood would easily fit in the mid-sized case; the lens required some precision cutting to fit the zoom lever at the side of the lens tube. The M42x1-MTF and Kinor-16SX-2 to MTF adapters from RafCamera is always attached to the lenses, so the cutout accomodates for that. The bottom layer was cut out with somewhat more sparse foam cubes to adjust the shapes of the objects, in some cases leave it uncut entirely. With the large-sized case the layers were often plucked with different amounts and sizes as well, to accomodate the forms of the items, such as with the matte box and the follow focus, as well as the top handle and shoulder brace. In certain cases parts at the bottom layer were cut to hide an object under the main item that was fitted to the top layer, such as with the two handles where the SmallRig rubber grip is packed underneeth the metal threaded top handle, and the Krasnogorsk-3 hand strap being hidden beneath the telescopic shoulder brace. The entire process was finished in less than an hour, in both cases. Afterwards, I have made som rearrangements, gluing portions of the foam back with superglue with good results. Everything feels robust and well protected. The price is very low at $45 and $70 respectively, but put a brand name on the case and it would have cost twice or thrice as much for equal performance and quality; many reviewers hail it and compare it with much more expensive equivalents.
 Cons: Some reviewers report that the foam lining insert cubes easily come off after wear, so I have to be careful not to damage the cutouts when handling the packing and unpacking. Some portions have loosened up after continues unpacking and packing, where I have used superglue to mend them back with good results. When unpacking larger objects, such as the camera chassis, the top layer lining loosens and wants to come off, which is a bit annoying; one as to push it back in place each time. Therefore, I have glued the two layers together with superglue to stabilise the inserts further.
